At the end of my last post, I had talked about some ideas I had for the kitchen. Those upper cabinets I talked about moving are still firmly in place, but my bottom cabinets are a very different color. That's another post for another day, though, because that project got usurped by another much more exciting project and so isn't 100% complete just yet.
In case the title of this post wasn't a big enough hint, that more exciting project was building a deck. While we were discussing what we wanted our next undertaking to be, David suggested a deck in the backyard. This is something we have wanted to do for years, so I didn't hesitate to say "UM YES LET'S DO IT RIGHT NOW, I'LL PUT MY SHOES ON LET'S GO TO LOWE'S." I tend to get excited about starting things.
Now, since neither of us has ever built a deck before, we started out by watching lots of YouTube videos and reading lots of tutorials. When we felt we had a pretty good grasp of the process, we started sketching out our ideas. We started out pretty complicated, with multiple levels and non-square shapes. Then we realized we were complete novices and really just needed to chill out and keep things simple. Thus, we landed on the simple rectangular deck that you see at the top part of the drawing, knowing if we wanted to add on down the road, we could.
With our layout decided, we took things outside. We used stakes and string and a string level to determine how much of a slope the yard was at and how high our deck would need to be at the low point. We also used the stakes to mark where our support posts needed to go.
We cut down 4' sonotubes into 16" sections.
Then dug holes in the ground at the marked locations and stuck those bad boys down in the ground. We wound up with 10 posts total, 5 on each long side of the deck.
Then we filled each one with concrete and stuck in the post bracket. We used the string and posts to make sure all the brackets were in line with each other.
After the concrete had dried for 24 hours, we started
setting the posts and attaching the outside supports, for which we used
2x8s. The deck is 12' wide by 24' feet long which makes things much easier for us since boards come in 12' lengths. Hooray minimal cutting!
This was a pretty tedious process, since we had to make sure everything was level and square.
Once everything was attached, our low end of the deck ended up being quite a bit higher than we had anticipated, 20" off the ground. We had not included a step in our original plan, but at that point, we knew we would need one.
After that, we laid down landscape fabric to prevent weeds and grass from growing underneath. We extended it out past the outside of the deck because we plan to do a gravel border.
Then it was joist hanging time! We had to add a few extra joists to accommodate the decking pattern we had chosen, which was a "picture frame border" and then laying boards long ways with a "zipper seam" in the middle.
Chico was very helpful throughout this step.
After all the joists were attached and levelled, we added in the supports for the step.
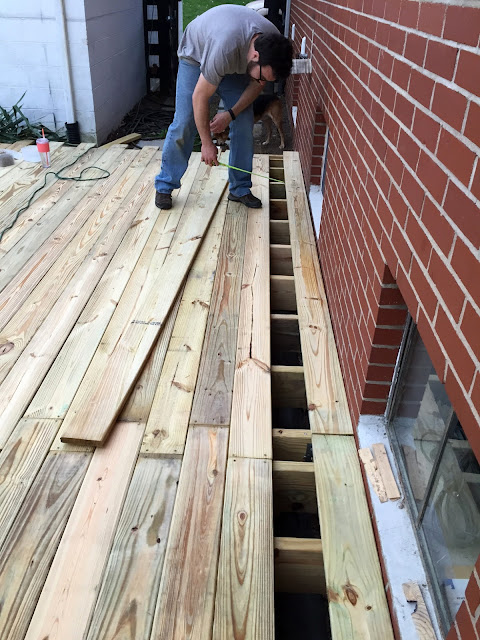
What a fine looking step. At this point, we started laying down deck boards like no one's business. We only attached them to three joists at first just to get everything in place.
We ended up needing to shave 1/2" off the last row. We actually opted to take it off the second to last row, so that the mitered corners of our picture frame border didn't get thrown off. You can see what the zipper seam looks like here, too.
When everything was in place, we used the circular saw to cut off the ends of the boards flush with one another. We just made sure to set the blade depth so that it would cut through the deck boards, but not into the underlying structure.
Doing it this way is much faster than cutting each board as its laid down. After that, we attached all the skirt pieces to the deck so no creatures can get underneath and make it their home.
For the final step, we had some wonderful friends come over with their drills and we went nuts screwing in all the boards. We snapped chalk lines down each joist, then two people went down each line hammering in the screws to get them started, while two others followed behind with a drill screwing them all the way in.
It made what would had been a tedious, days long step go so much faster!
And with that, we were done! Everything got finished after dark, so I have no photos of the empty finished deck. We immediately moved everything up and hung out for a while. The entire process took about 3 weeks, with only working for a couple hours some evenings and when we had free time on the weekends.
I have some very exciting plans for incorporating the fire pit and decorating everything.
We have to wait a couple months for the treated lumber to dry out before we can stain and seal the wood, which is a bit of a bummer because I'm really looking forward to staining this baby a nice deep brown.
I think the thing I'm most excited about is not having to move all the patio furniture every single time I mow. Woo hoo!!


