Thursday, April 21, 2016

Rockin' & Rollin'

One last project we wanted to complete in our new backyard oasis (besides staining the deck when the times comes) was laying down some gravel. I had mentioned previously that we were going to do a gravel border around the deck. I wanted to do that to create a buffer zone that would make mowing much easier.

I also wanted to gravel around our fire pit which had previously been a lonely little pit all by itself in the yard. With the addition of the deck, it was much closer to the action, but I wanted to really tie it in and make it feel like part of the same space.


I started out by laying my landscape fabric in the rough shape that I wanted. Since the fabric is rectangular, and the shape I was going for was round, it was a pretty rough layout. After I got things looking generally the way I wanted, I took my edging and used the included stakes to lay it out over top the fabric. The I went around the outside of the edging and cut off the excess. I did a bit of adjusting and finagling after that until I was happy with the way it looked.

Then we were ready for gravel! We went to a couple of landscape places around town, as well as Lowes to check out their bagged gravel. I learned that gravel is quite a bit more expensive than I had anticipated.


I fell in love with the first kind we saw which was a black granite chip. It was pretty on par with most everything else that we saw, cost-wise. So we ordered 2 tons of it and had it delivered to the house.


This is what 4,000 pounds of gravel looks like. A little underwhelming right? I was afraid it wasn't going to be enough, but as we got to spreading it, it turned out we had plenty.


David shoveled it into a wheelbarrow and dumped it out on the landscape fabric while I used a garden rake to spread it around. It took only about an hour before we were done.


I'm very pleased with it. And yes, we do need to mow the grass pretty badly.


And the border helps to hide any unevenness of our skirt boards, which is an added bonus.


I can't wait to make some s'mores out here.


With the extra we had, we filled in around our paver walkway. Despite a few seasons of attempted moss growing, the results were pretty lackluster. We didn't want to kill what was still there, so we just filled in gravel around it.


And with that, out backyard oasis is complete! It's been such a huge change in just about one month. We spend so much more time out here than we did last summer, and I am thrilled with how its all turned out.

Wednesday, April 13, 2016

And Then There Was Light!

Can I just say how much we have been loving our deck? It has been unseasonably cold and seasonably rainy so we have only been able to hang out on it a few times, but you better believe we have eaten dinner out there every day we could.

One thing it was lacking, however, was light, which made it difficult to enjoy once the sun went down. Over the winter, I saw some string lights at Costco that I fell in love with. They had large standard looking light bulbs that hung down and were generally awesome looking. I told David that when we built our deck (which at the time was still a "some day" project) I wanted to get them. And so now that we have our deck, that's just what we did.


As for how we installed them, I looked at a few tutorials on Pinterest and decided upon this one. I liked it because it is easily removable unlike some others I had seen that involved setting conduit or posts in concrete. We followed their directions to a T, with one addition.


We added a pipe strap further up the conduit for added stability. We were especially concerned about that particular factor because our string lights were of the heavy-duty commercial variety, and thus quite a bit heavier than most lights.


We used three poles on the yard side. On the house side, we attached metal hooks to the board that runs along the house right under the soffit. I'm sure it has a name, I'm just not sure what it is. We pre-drilled a hole to get through the metal that covered the wood, and then just hand screwed the hook in place.


I eagerly awaited nightfall all day long. And I was not disappointed.


You'll notice we also added some rope light. We ordered it from Amazon and attached it under the 1" overhang of the deck with the clips it came with. It's as much safety as it is for ambiance, since we didn't want anyone falling off the edge of the deck or missing the step down.


I'm so thrilled with how it turned out, and can't wait to enjoy many warm evenings under these lights!

Friday, April 1, 2016

I've Got the Blues

One quick change before I get into the cabinet talk. The dining room was still sporting its ceiling fan over the dining table from its former days as a living room. While having a fan in the living room was nice, having it over a dining table was a little less nice. So when I saw someone on Facebook selling a light fixture that I immediately fell in love with, I didn't hesitate to get all over that.


I scored this like new beauty for only $60. We changed it over to a dimmer switch and it makes the dining room 1000% more cozy in the evenings. Love it.

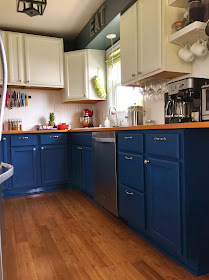
Now on to the cabinets. I had made my poorly photoshopped rendering, which I loved. I wanted to make sure I loved in real life, too. So I removed all the bottom cabinet doors, took them out to garage, where I had created a make-shift spray booth, and sprayed on one coat of paint. After it had dried, I brought a couple doors in to see how they looked.


And well... I was unsure. It was very dark. I considered abandoning ship or trying a different color. I already had this color on hand (it's the same as the accent wall in the dining room and the stairwell) and I was really wanting to keep this project nice and free. So I left the doors sitting there for a day while I weighed my options. I finally decided that I would forge ahead and really hoped that I wouldn't regret it.


I alternating spraying the doors out in the garage and painting the cabinets themselves with a brush inside. This is coat #1 inside.


Followed by coat #2.


It took three coats in all to get even coverage. I left all the drawers and doors open for a couple of days to make sure there would be no stickage. It was quite a pain in the butt to cook around the doors in the already small kitchen, let me tell you.


I waited to paint the toe kick last because I knew it would be annoying and I didn't want to worry about touching wet paint on the cabinets while I was rolling around on the floor. But then the whole deck thing happened, so it stayed looking this way for a few weeks.


So after the deck was completed, and I was going through project withdrawal, I whipped out my painters tape, taped off the floor and got 'er done.


I'm actually pretty happy with it and don't feel like it's too dark at all so I'm glad I forged on in the face of doubt. It did create another project for me, however. The wall color and the bottom cabinet color don't even remotely go together. So I will eventually be painting the walls. I'm thinking a really pale grey.

I'm still thinking about removed those upper cabinets and tiling the backsplash, too, so you know I will let everyone know if/when that gets done!