Wednesday, July 17, 2013

Adding Some Color with Doors


After painting the steps I couldn't get the idea of painting the door out of my mind. I started out by working some Photoshop magic to get an idea of what color family I wanted to go with.


This ended up not helping me that much, because I liked all of them. Eventually, through talking it over with David and some friends, I narrowed it down to either yellow or blue.


Well, that went out the window when I got to the store and started looking at colors. These are all the ones I brought home. This is when I realized (along with Cait's prodding) I wanted to paint the front door yellow. I've always enjoyed the red that it was, but didn't enjoy the fact that it blended into our red brick. Not wanting to have the front and side doors the same color, I decided a shade of blue would be my choice for the carport. However, the kitchen (into which the side door opens) is also blue and I wanted something that would pop both inside and out. I eventually narrowed things down to three colors.


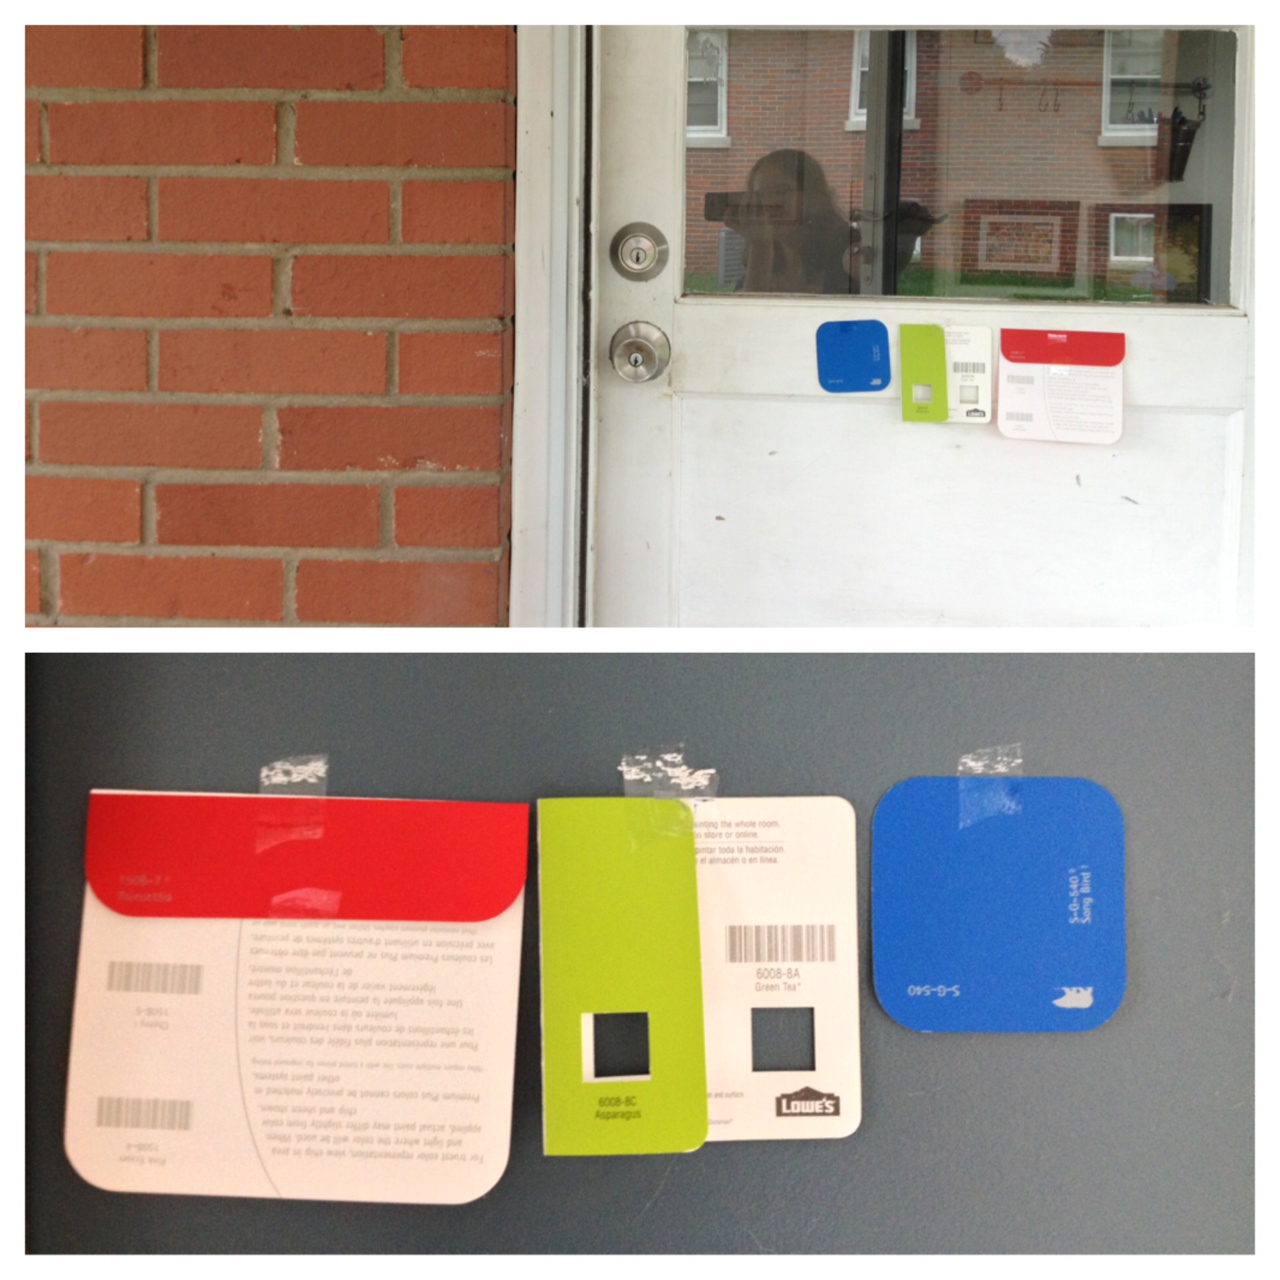
After agonizing over my choice for days (seriously, days) I decided on the green in the middle. I grabbed it at the store on a whim, not thinking I would even like it. It took a little cajoling, but David also agreed to the color as well.

I chose it because it looked good with both the brick outside, and the kitchen wall color. The red looked good inside, but blended into the brick too much. The blue looked great outside, but clashed with the different shade of blue inside.


Before I could get to painting, I had some prep work to do.  The front door has a glass panel in it that is a huge source of air leakage. It actually whistles on windy days. 


So I took a tube of clear silicone and caulked around the edges on both sides of the door. It hasn't been windy enough yet for me to tell, but I am hopeful this will make a big difference. I also wiped down both doors, spackled any nail holes, or chipped areas and removed the knobs.


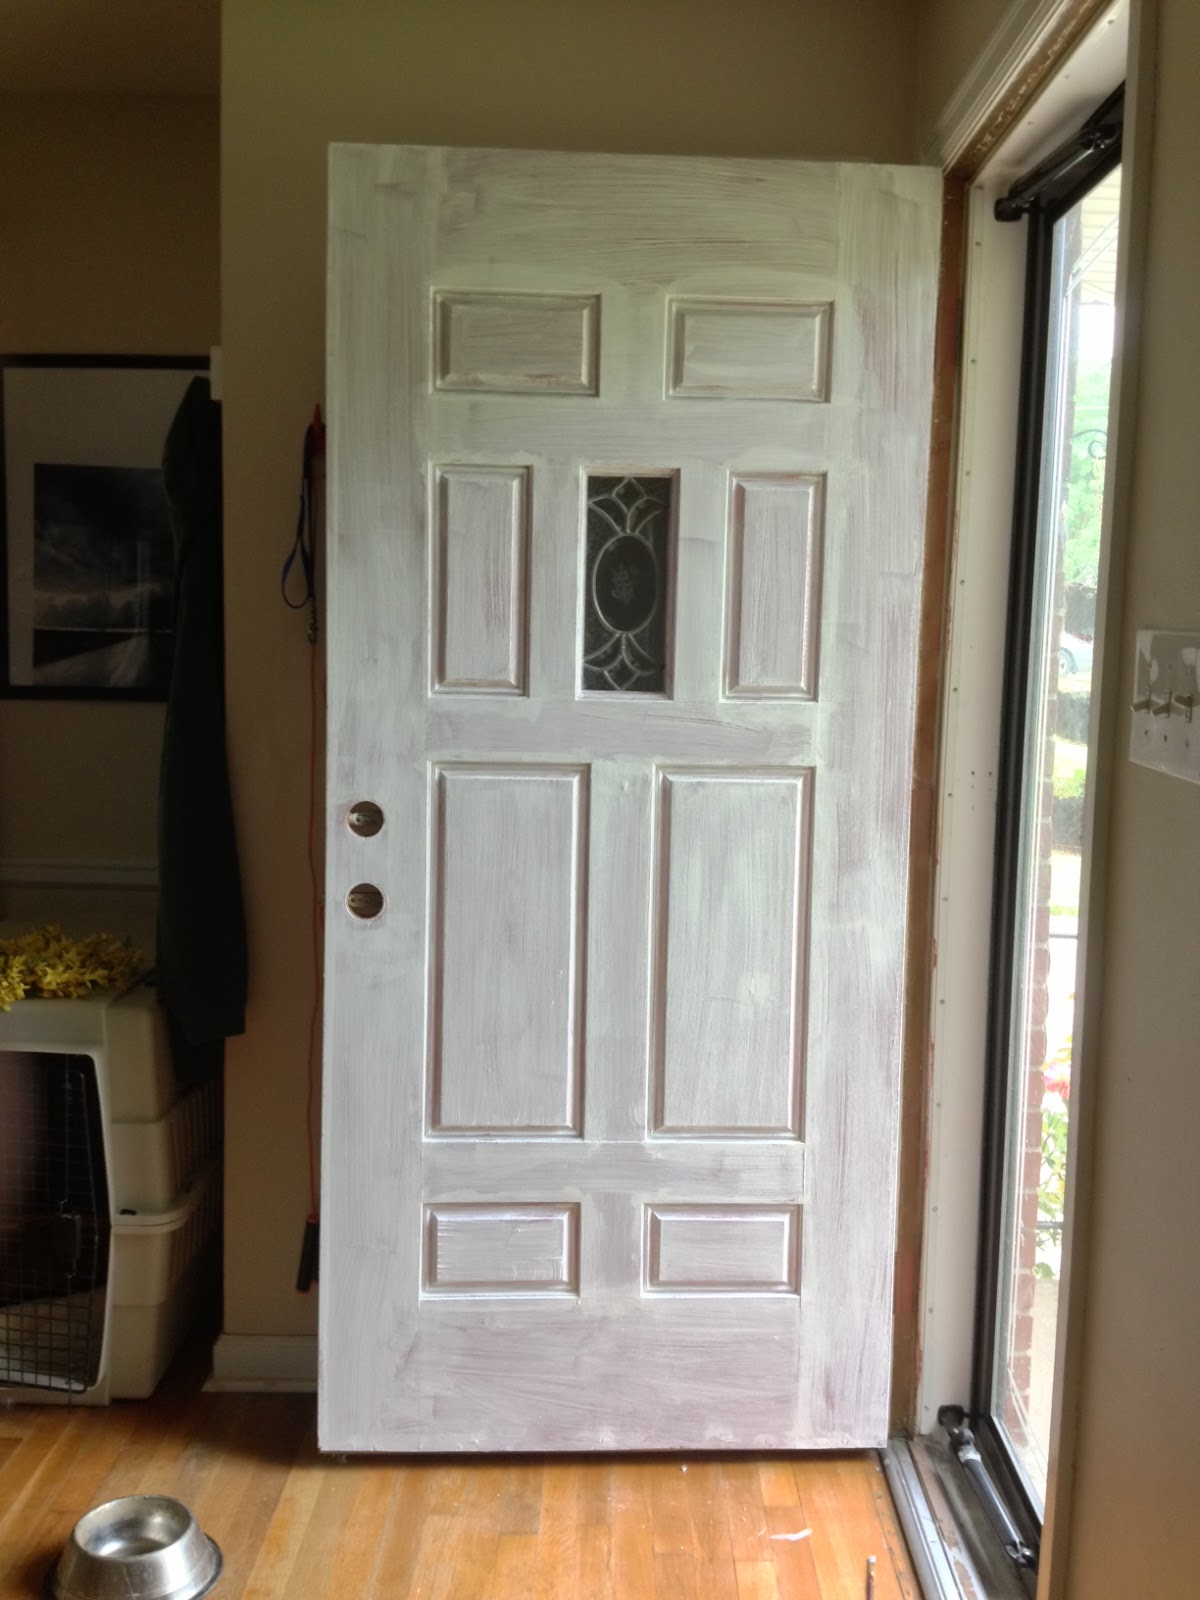
Since I would be painting yellow over red, I also applied a coat of primer on the front door. I realize now, I should have applied two, because two coats of paint later, the door still looked like this.


In the end, it took 8 coats of yellow in addition to the primer to get full coverage. The side door took only 3 coats with no primer, since I was starting out with a white door. 


While I was at it, I (or, more specifically, Cait) also put a fresh coat of white on the back, since it was looked quite dingy.


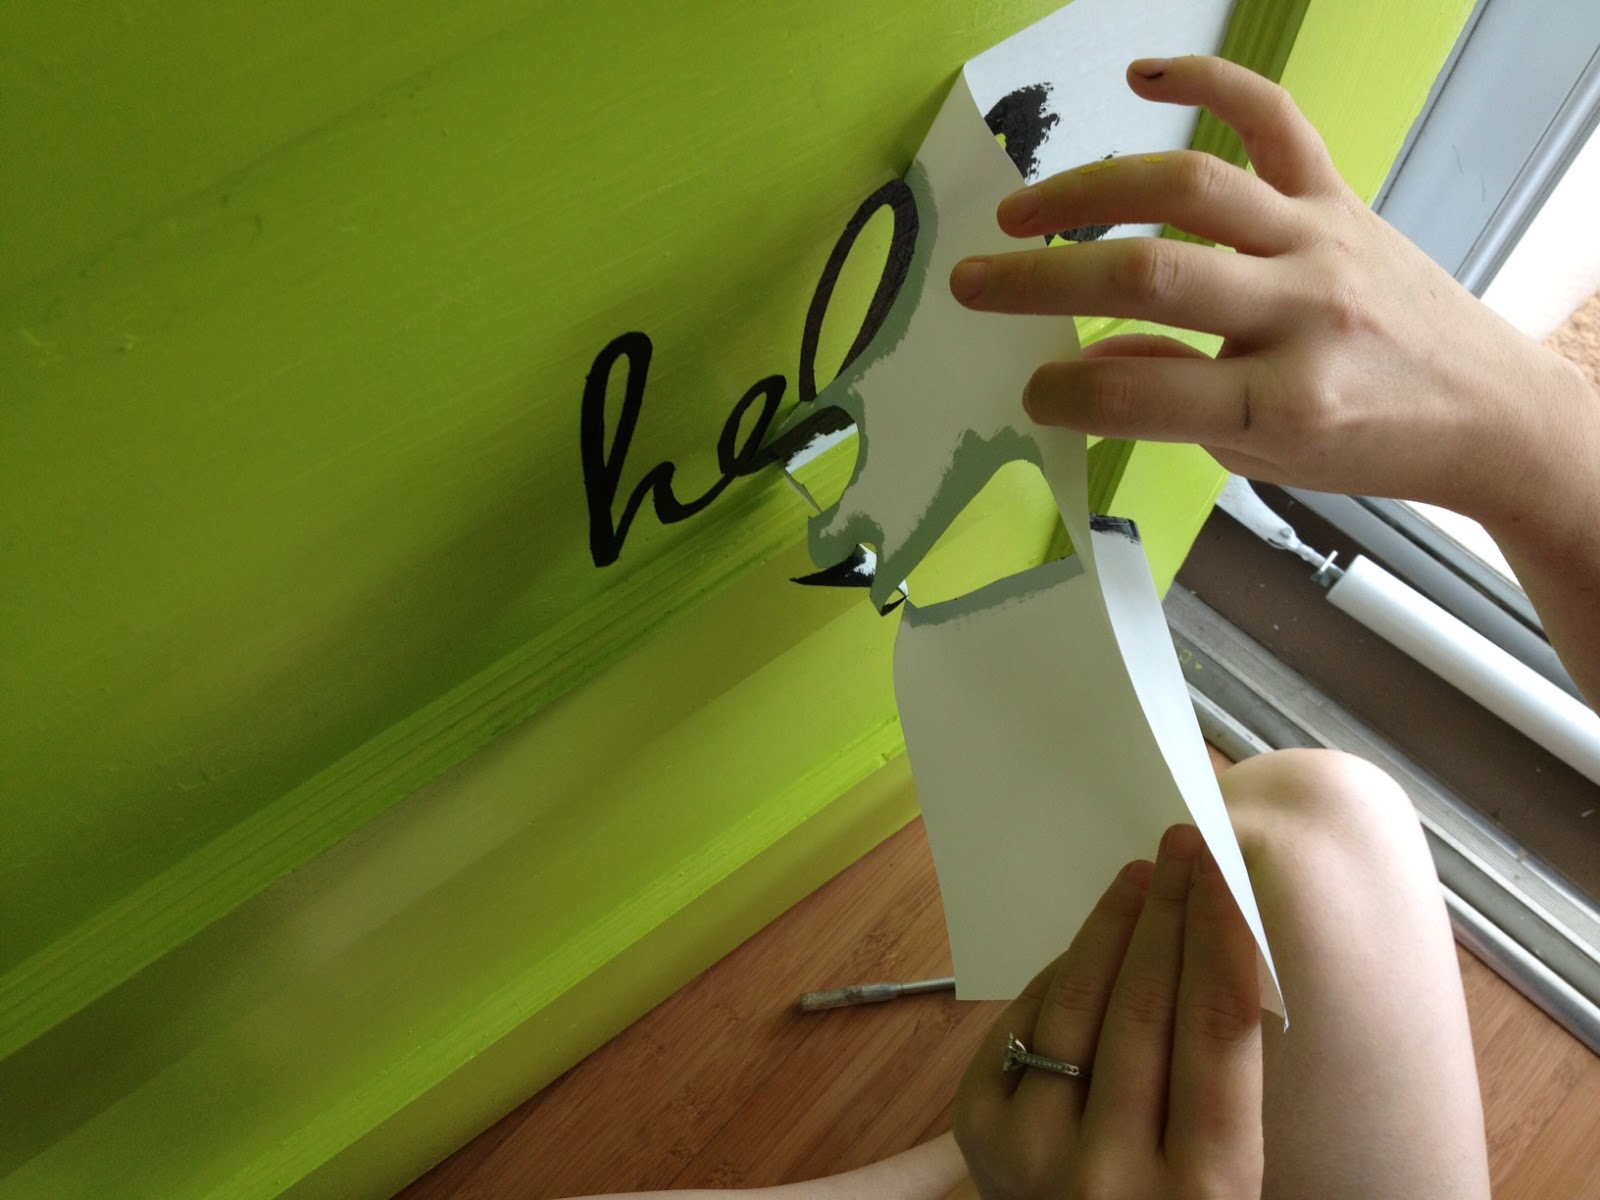
Before I declared myself finished, I had one more little project. I wanted to add a stencil to the carport door to greet visitors. I started out by applying contact paper to the door, then printing out what I wanted to stencil onto regular paper. I taped it to the door over the contact paper.

 
Then I used my exacto knife to cut out the letters, making sure to use enough pressure to go through both layers.


Then I used the exactly knife to help me peel up the cut out section. It doesn't always peel up easily, so some additional cutting is needed.


I carefully applied my paint. I used acrylic artist paint because I was too lazy to go into the basement to get my black exterior paint.

 
While it's still wet, peel up the contact paper. You'll want to remove the insides of any letters first (like the inside of the E) so there is less chance of smearing. Use your exacto knife to peel up the edges.


Then it was just a matter of letting everything dry. I left the doors open for as long as I could (until I went to bed) so there was less chance of anything sticking.


Much happier looking!


I painted the edge of both doors as well, so even if they're not fully open, there is still a fun slice of color.


 The back of the door looks much brighter and cleaner now.


From both the living room and the kitchen, the door fits in and really livens up the house. And I just realized that the door color matches the picture in my largest frame. 


The front door is looking equally cheery.

 
There is no longer any issue with it blending into the brick, either!


Though it may not look like it, even Chubby approves of the color.

Sunday, July 7, 2013

The Ghost of Astroturf Past

Once upon a time, the steps leading down into the carport were covered in astroturf. Sadly, I don't have a picture of it with which to assault your eyes. Needless to say, once David moved in, it didn't stick around for long. Unfortunately, the adhesive did.


At the time of removal, some effort was made to clean it off. We tried relentless sanding, which helped smooth things out, but didn't help it look like bare concrete.


And so the stairs stayed this way for a few years. Don't judge.


Then, through the influence of advertising, we decided to do something about it. We had seen some TV commercials for Behr's Deck Over and David suggested that it might work well on our stairs. We went to Lowe's to see if they had a similar product (because Lowe's is closer to us) and indeed they did. It's called Rescue It and it's made by Olympic. But before we brought home a gallon of it, we wanted to get rid of some of the adhesive left on the concrete.


 We took home this stuff at the recommendation of the girl at the paint counter. Let me say here that I'm not usually a person who has much regard for her own personal safety. But you better believe I wore solvent-proof gloves and safety goggles while I used this stuff. It is serious business.


It looks like snot.


I brushed it on a little at a time, at first using that foam brush, which quickly started disintegrating, so I switched to a regular paint brush.


I waited 15 minutes, as instructed, then I got to scraping.


It worked so well it was almost disturbing. This ended up being a really unpleasant task, which I wanted to quit about 100 times before it was done. After finishing up, we wiped it down with mineral spirits, then hosed it off really well and left it to dry overnight.


Then it was on to the fun part! Olympic's paint can be mixed in quite a few different colors. We chose one called Taupe. We'd like to eventually have the gutters, soffits and exterior trim repainted a nice taupe-y color, so we figured having matching steps would be the bee's knees. It would also give us an opportunity to test out a potential color.

This stuff is super thick, so I stirred several times while applying it. The first coat covered really well, but the can said to apply two, so I did as I was told. I applied the first coat entirely with a brush, and after waiting an hour, applied a second coat with a roller to see if I could tell a difference.

Rolling was definitely a lot faster, but messier (hello, splatter) and didn't fill in the bumps and cracks like the brush did. If I ever find myself doing this again, I'll stick with the brush.

Look at those nice, smooth steps! In total, this project took about 3 hours for adhesive removal, and another 1 1/2 for painting (not including drying time). The paint can says to wait 12 hours before walking on the painted surface, so we will be letting it sit until tomorrow morning.


This project has gotten me inspired to spruce up our most-used and until now, neglected entry. I'm thinking of some bright colored flower pots flanking the door and maybe a wall light on each side? Maybe I'll even paint the door (which is open here so you can't really see it, but is white).  Let me know what you think!

Wednesday, July 3, 2013

Freakin' Bunnies


David and I have kept a garden every year since David moved in. This is our fifth garden, and it is shaping up to be our most successful. My family always had a garden growing up, sometimes as larger as one acre. Some of my favorite memories are of jumping from one dirt hill to the next right after the garden was tilled with the tractor or of playing hide and seek in the corn. So I had some basic gardening knowledge going in. However, that doesn't mean there hasn't been room for me and David both to learn quite a bit along the way.

1. Don't make your garden too big. 
This was a big realization in helping our garden become more fruitful. The first couple of years, our garden was about 4 times as large as it is now. This might seem like a good idea, but as two busy people with full time jobs, it was way more than we could reasonably maintain. Since downsizing, we have been more able to keep things under control. Which brings me to my second point.

2. Weeding is important.
This may seem like a "duh" to many people. But I really hate pulling weeds. It was one of my most dreaded chores growing up and I have not learned to love it. It's easy for me to adopt the attitude of "oh, the veggies will be fine, they can live harmoniously with the weeds." This is not the case. This year, I have made a real effort to stay on top of weeds. After letting things go too far in late spring, I finally got around to clearing things out and within a few days, saw a huge growth spurt from all my veggies. This was no coincidence.

3. You can water too much.
This was a new realization to me this year. Last year, the sprinkler was set up by the garden on a timer to go off every morning and we had one of the worst yields ever. I did some reading, which recommended no more than 1" of water per week. This information really rocked my world, so this year, we have watered the garden only a handful of times, usually only after planting new plants. Other than that, we have relied only on rain, which fortunately has been fairly regular this year, and our crop has been tremendous so far.

4. Work your soil well before planting.
Tillers are expensive, we learned. The cheapest one we have found is over $600. That investment just isn’t worthwhile to us with the small garden we maintain, so we opted to buy a small cultivator instead for around $200. In years past, we felt this worked well enough, but it would seem we were wrong. This spring, David decided to first use a shovel to hand turn the soil to a depth of about one foot. Then he used the cultivator to break up the large soil chunks. This resulted in a much less compacted, easy to work with soil, which I believe is one of the reasons we have had so much success this year.

5. Plant marigolds in your garden.
This is something David learned a couple years ago. The flowers help deter several types of bugs that damage plants with the added bonus of attracting more pollinators.


As for what we choose to plant, we tend to stick with easy to grow veggies that work well in our small space. And, of course, we always choose vegetables we enjoy eating. This year, you can see what we've got growing in the image above. We also have some lettuce and kohlrabies in the front left corner that you can't see in the photo. In the past, we have also grown onions, corn, carrots and radishes. One year, we accidentally grew pumpkins, when the previous year's jack-o-lantern got tilled into the soil in spring.


Bugs and wildlife have always been a issue for our gardens as well. Our squash frequently succumbs to insect infestations and rabbits wreak havoc on our fledgeling plants each spring. This year, we resorted to covering the garden with bird netting to keep the adorably irritating creatures out when they ate our tomato and pepper plants down to the ground. Fortunately many of them were able to grow back.


We've also tried our hand at growing fruit. The summer David purchased the house, he planted a blackberry bush. Birds are especially frustrating for these plants, as they eat the delicious ripe berries before we get a chance to pick them.


We recently mulches and staked our plants in the hope that they will do even better when they're not being overtaken by grass and getting run over by the lawn mower. You can see David chasing Chico around the yard above, as well as our peach tree. This tree was here already, but we did plant another at the same time as the blackberries.


We have never gotten any fruit from either tree. Apparently, peaches ain't easy. You have to remove 90% of the fruit for any of it to reach maturity. Not to mention they are extremely susceptible to insect infestations and diseases.


So although our trees are heavy laden with fruit each year, the only ones that get to enjoy it are the squirrels.


And now for some gratuitous photos of  our vegetables. This is a baby kohlrabi, which, for those of you who don't know, are similar to a turnip.


We haven't yet gotten any squash, but the blooms tell us we will soon enough.


Green beans. Delicious raw straight from the garden.


This is the second year we have planted cucumbers and the first year they've been successful. And they have been WILDLY successful. They have a net for the vines to climb on. I plan to make some pickles later in the summer.


No tomatoes have become ripe yet.


But they will be soon enough.


Serrano pepper (on the left) and pimento peppers on the right. We also have Tabasco peppers planted that haven't produced any fruit yet. I'm excited to try these last 2 types, as I have never tasted them before.

Does anyone else have any gardening tips they've learned along the way? I'm definitely still learning as I go and hopeful that next year's garden will be even better!