Wednesday, November 13, 2013

Replacing the Garage Door Part 1


Our old garage walk-through door was in some major need of replacing. It was literally falling apart. Someone could have looked at it too hard and it would have fallen off the hinges.


The frame wasn't in great shape either and had started to rot at the bottom. It had also been home made by the previous owners and wasn't exactly easy on the eyes.

My mother wound up with an old exterior door when she replaced hers that was still in good shape, so we took it off her hands and got to work.


We had a couple of fun surprises: this is what the inside of the old door looked like.


When we removed the old trim, we discovered that a horseshoe used to be above the door.


The first step, after taking the old door off the hinges, is to remove the old frame. David did this using a pry bar to loosen things, then running a reciprocating saw down the space between the door frame and the cinder blocks to cut through all the nails and screws holding it in place.


Then he used a hammer to free it from the opening.


We purchased an exterior door frame kit from Lowe's that includes weather stripping, but it ended up being a bit too small for our opening.


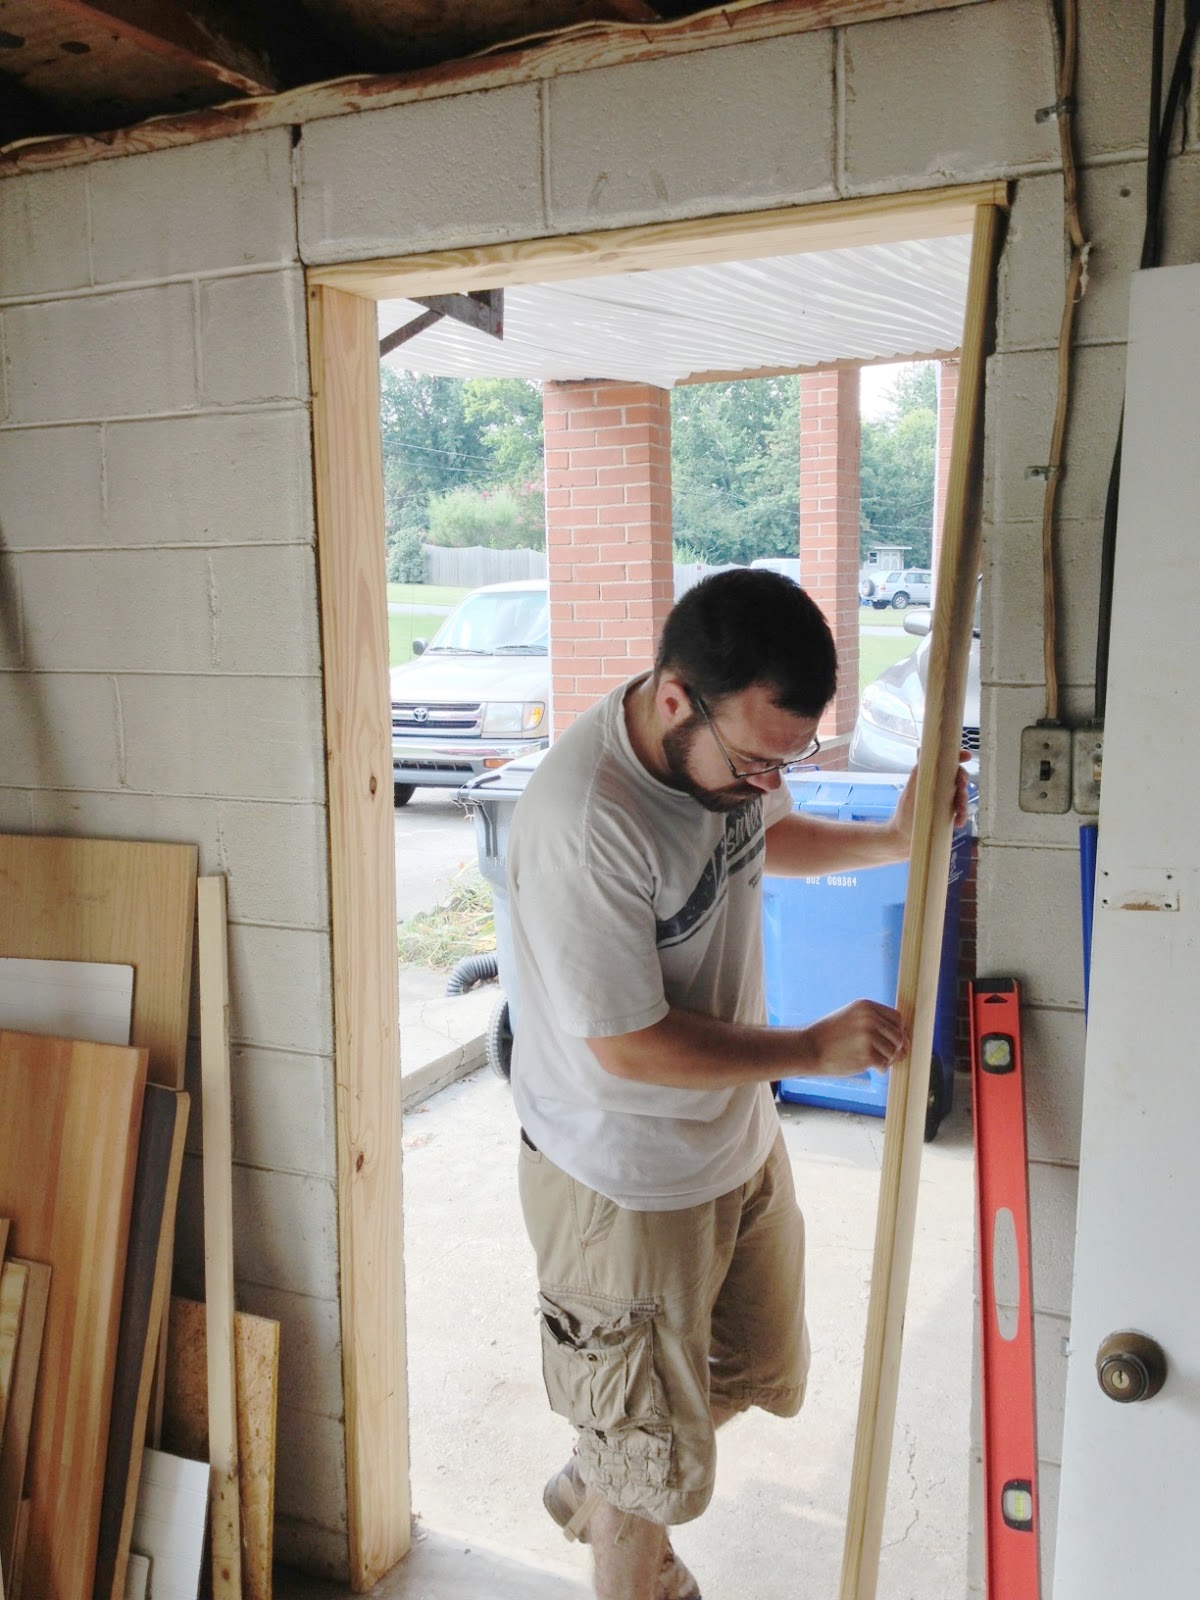
We fixed that problem with some 6" wide decking boards. David cut them to fit the opening on each side. We ended up not using the top board because it made the opening little too short for the frame to fit so ignore that piece.


Then we tested the fit of the frame again and it was just right.


He attached the decking boards to the cinder block using toggle bolts and taking advantage of the naturally occurring holes in the block.

David marked and attached the door hinges we bought to the door itself according to the package's directions. We needed to carve out notches in the door frame to accommodate the hinges next (pre-hung doors will already have all this done).


David removed the frame and laid it down on the floor, then set the door inside of it, as though it were closed. He then marked the location of the hinges on the door frame so he would know exactly where to carve out notches so that they would match up properly when the door was hung.


Because the door is steel, we weren't able to carve out notches on the door itself like you normally would want to. Instead, he used a chisel and mallet to make the notch twice as deep so that when the door is shut, it still sits flush with the frame.


Once we got the door hung, it actually set rather well in the frame, so there wasn't any shimming necessary. I painted the door with the same yellow paint that's on the front door, since you cane see both from the road and it helps to tie in our detached garage to the house.


Then we attached some oil rubbed bronze hardware to complement the black window frames on the door.

We still have some finishing touches to put on the door in the way of trim, but the weather has suddenly turned very cold, so we will have to wait for a warmer day to finish this project up. I'll be back with another post when that happens!


Tuesday, October 8, 2013

It's The Most Wonderful Time of the Year!

No, I'm not hopping on the Christmas bandwagon early, I just happen to think fall is the best season of them all. Amidst all the working on wedding projects, I found time one night to convince David to go up into the attic and get down my fall decorations.


And I thought, wouldn't it be swell to share a little fall decor.


I actually made that wreath with a grapevine-type wreath I got at Michaels which I glued some fake fall leaves to.


I got these little guys last year at a consignment store. They are hanging out on the side of my pantry cabinet.


Since I don't have a mantle, I like to decorate my tv stand as though it were one.


I love lots of candles in my fall decor. It feels so cozy on chilly nights.


My monster foot stays out year round, because it's that awesome. He's just especially appropriate at this time of year.


I like to fill up the apothecary jar with seasonally appropriate stuff n' things. It currently has some scented pine cones and fake leaves left over from my wreath. At Christmas, I fill it with extra ornaments and ribbon.

Does anyone else have any fall eye candy to share? I love checking out inspiration!

Thursday, September 26, 2013

I Saw the Sign...

The wedding is going to be... well... in the middle of nowhere. While I assume most people have GPS these days that will show them the way, I figured having some signs up to assure people they are, indeed, still going the right way certainly couldn't hurt. So I got on that and knocked out three signs in about an hour.


I started out by cutting out the sign parts and posts using scrap wood that I had in the pile. I used some treated and some untreated. Though they will be outside, it's for only one day, so using untreated wood won't pose a problem. For the sign part, I used 1x6" boards and for the posts, I happened to have a decking board that had been cut long ways into a nice post size. I made each sign in the shape of an arrow, using the corner of a sheet of paper to trace the angle. I cut out each piece using a jigsaw, then screwed the post onto the back of the sign using two screws. Make sure to pay attention to which way the arrow is pointing.


I designed my wording on the computer, then printed it out. I then traced the letters over the wood with a pen, using a lot of pressure.


This left a nice little indention, which I then filled in using a black paint pen.


And that was seriously it! If you wanted to, you could paint, stain or seal the wood, but I opted to leave mine natural for simplicity's sake.


Hopefully, they will help point guests in the right direction so no one gets lost out in the country!

Two Quick Wedding Crafts

In case you're starting to sense a theme in my posts lately, you're not wrong. The wedding is in 16 days so I have been getting a lot done the past couple weeks.

The first thing I made was a card box. One of those practical things you need to have that is easy to forget about. I didn't want to spend much time or money on this item, so for the most part, I worked with what I had.

I started out with a cardboard box that I got for free at the liquor store. Stay classy, friends. I also used some extra fabric I had from making curtains in the office. This "fabric" is actually two twin sheet sets. I used the flat sheets for the curtains so I still had both pillow cases and fitted sheets left.

The first thing you want to do is tape your box shut. Then use an exacto knife (or box cutter) to cut an opening in the top that will be the opening people drop their cards into.

For this project, I cut up one of the pillow cases so I was working with a flat piece of fabric. Then, I sprayed my box with spray adhesive and smoothed the fabric over the top of it.


The edges and bottom, I folded as though I was wrapping a gift. When everything was nice and smooth, I glued down the edges with hot glue.


Then, I used an exacto knife to cut through the fabric that covered the opening. I used a glue gun again to fold the edges under and hold them in place for a clean edge.


I found a cute slate sign at Michaels, which I hot glued to the front of the box and used chalk to write "cards" on it.


And that was it!

Next up was a chalkboard sign outlining mine and David's "love story" or the series of major events that lead up to the big day.


I started out with an ugly old frame that I found at the Goodwill for $3.50. I removed the staples holding everything together at the back and took apart all the pieces. I gave the glass a good cleaning, painted the frame with a sample pot I had already, then painted right over the art with chalkboard paint that I mixed up.


Looking much better already! I started free-handing my words and was happy with my heading, but the dates and events just weren't coming out the way I wanted. At Cait's suggestion, I designed my text on the computer, printed it out, the covered then back of the paper with chalk. I held the paper on my chalkboard surface and traced over the letters with a pen. This provided a faint outline for me trace with the chalk.

This method provided a much cleaner look that I was much happier with! I then reassembled everything, using duct tape to hold everything together, in place of the staples that were originally there. Not the most secure thing in the world, but it will hold well enough for its purpose.


I worked on both these projects sporadically over a few days, but if you were ready to get down to business, each could be completed in about an hour.


I'm sure I'll have more projects to share as the day gets closer and closer!

Wednesday, September 11, 2013

Wedding Party T-Shirts

After seeing lots of cute bleach pen shirts on Pinterest, and reading a few tutorials, I knew I wanted to make some for me and my bridsmaids to wear during my bachelorette party and also white we are getting ready the day of the wedding.


I got some plain v-neck t-shirts from Target for each of us.


I took a piece of cardboard and wrapped it in wax paper. It only needs to be as big as the design you're putting on the shirt.


Slide the cardboard inside the shirt behind where the design will go, then smooth everything out.

Then go to town with the bleach pen. I had never used one before, and it's not as much a "pen" like I expected, as it is a small opening like an Elmer's glue bottle.


If you make a mistake, it's best not to try to fix it. I accidentally got a drip and made some things a bit too thick and globby but it probably would have looked worse if I had messed around with it any. You can go back over and thicken up any thin spots so everything is an even thickness.


Let them sit for 10 minutes or so. You can see around the edges of the bleach and through the back of the shirt that it's working. This next part if definitely easier if you have a helper. Here's how we did it.

I held the shirt open from the neck, keeping the top and bottom layers from touching while Cait removed the cardboard. Then, we carefully turned the shirt upside down (so the bleach design was facing the floor) then put it under the faucet.

Turn the water on high and rinse the bleach off from the inside of the shirt so that any bleach falls straight down into the sink without smearing onto any other part of the shirt.


Once it's all rinsed off, use hand soap to wash it and then run it through the washer and dryer.


Super simple! The hardest part was making sure I didn't spell anything wrong! Now that I've done these, I wanted to make even more bleach art clothing.

Bling Bling Holder

For the wedding, I knew I needed something to hold our rings during the ceremony. We aren't using a ring bearer and the bridesmaids dresses don't have any pockets, plus I didn't want to put the pressure on them of having to keep track of something so small and important. I found some inspiration from this pin and adapted it to fit my needs.


I started out with a small wooden box from Michael's for $1. I knew that I didn't just want the rings loose in there, but I also wanted them to be easy to remove during the ceremony so I didn't want to tie them down or anything like that. I first considered using dowel rods to make a ring holder (like this). I wandered around Michaels quite a bit pondering my options, when I came upon a particularly thick sheet of foam in the kids' craft aisle. I took it home for an additional 99 cents, and went on my merry way.


I started out by cutting out a rectangle of foam the same size as the interior of my box and then checked the fit. I cut out two more rectangles using the first one as a template. I pushed all the pieces of foam down into the box, one on top the other, then used a knife to cut three slits, one for each ring. Putting my engagement ring back on is part of our ceremony, but you could just cut two slits if that's all you need. They don't have to be perfect because you won't really see them once the rings are in place. I pushed the rings into the slits to make sure they fit and were spaced well.


Then I took the foam back out and stained my box. The stain color was Kona by Rustoleum (the stain I bought for my failed counter top project).


Once the stain was dry, I glued all the layers of foam into place in the box using plain old Elmers glue and allowed that to dry. Then I used a white paint pen to add some words to it.


It was an extremely simple and cheap project and I think it turned out super cute!