Wednesday, August 28, 2013

Planning Out the Basement


The basement in this house is kind of the bane of our existence. When David moved into the house, the basement was "semi-finished". It had a floor and a ceiling and walls, but it was dark and scary.

He quickly got started ripping things out to make way for a bedroom that was completed a few weeks later for a roommate that was moving in.


It has an egress window that lets in lots of light and actually feels like a real room that's part of the house. For those of you not in the know, an egress window is one that has to meet certain specifications so in the event of a fire or other emergency, someone can escape out of it. Installing it required digging a window well on the outside. An egress window is required to have a legal bedroom in a basement.


As for the rest of the space, 4 years later, not much else has happened. All the old wood paneling, flooring and ceiling has been removed.


Insulation has been put up over most of the walls and ceiling, and some walls have been framed out.


This is the current layout of the basement.


And this is where we'd like to end up. The big hang up here is the bathroom. We need to get a plumber to come and assess the situation with sewage ejection pumps, drain lines, etc. and give us a quote. We may scrap the entire idea of a bathroom if the job is out of our budget, otherwise, we will need to get permits (both plumbing and electrical) as well as inspections for everything before we can proceed much further. In the meantime, I've been soaking up lots of inspiration from Pinterest.


railing for basement?

I'd love to see some light and airy colors to make it feel as little like a basement as possible.
Why waste a perfectly good space by closing it off with a wall? Basement nook for reading or relaxing
I am also loving the idea of having a built in reading nook. So cozy!

Beautiful laundry room 
Not to mention having an attractive, functional laundry area with storage, instead of what we are working with now. I may or may not feel like I'm going to be murdered while doing laundry.


Recently, we have been making a push to get more done downstairs (I've declared no more major projects until this is complete) so hopefully in another 4 years, we will have a beautiful finished basement! Har har.

Thursday, August 22, 2013

Sprucing Up the Garage Door


A couple of years ago, we had the garage door of our detached 2 car garage replaced. I'm pretty sure it was the original door that was installed when the garage was built in 1968 and it had become an unreliable safety concern. This is one job we felt more comfortable leaving to the pros, and so we had it professionally installed. I had dreams of replacing the old door with a carriage style door. However, our new door had to be special ordered (it's even larger than your standard double door) and, due to its size, required a more powerful (read: more expensive) motor to heave it up. Once I saw the cost for the carriage style door (even for a standard size) I knew that wasn't going to be an option.

Recently, I had been seeing some really inspiring images on Pinterest, where people had used a kit from Home Depot to add the carriage doors details to a standard garage door. I kept it in the back of my mind, until I saw this pin and knew I had found what I wanted to do.

When I told David my plan to paint faux windows on the garage door, I could tell he was skeptical of how it would look. I ignored him and went to Home Depot to pick up the hardware. Because our door is so massive, I knew I would have to get two sets. I feared only having one set wouldn't have the impact I wanted. At $20 a piece, it wasn't exactly cheap, but I knew the effect would be worth it.


The first step in installing the hardware is much easier if you have a second person. One person can hold up each piece while the other stands back to make sure it looks level and even. Using a level in this case won't work since the pieces aren't straight across. If you don't have another person around, you could always tape up the pieces to hold them in place. 


Once I found my positioning, I marked where the screws would go and drilled pilot holes, then screwed each piece into place.


This part took me about an hour or so and was quite straightforward. Then, it was on to phase two: making the faux windows.


I measured each top panel, then made marks where my painter's tape edge needed to be. I found this by dividing the length or width by 2 (to the find the center point) and then subtracting 3/4" (half the width of my tape). I also outlined the edges of the raised panel with tape.


Then I applied two coats of Valspar's Black Magic in an exterior satin finish. This is paint that I had leftover from previous projects.


I peeled the tape off and was sorely disappointed. Because of the texture of the door, paint had seeped under my tape. To remedy this, I took a small artists paintbrush and some white paint and touched up around each square. It ended up not being nearly as time consuming as I had feared.

It still wasn't perfect, but definitely much improved. From a small distance, it's not noticeable.


And that was that! We would love to one day cover the painted cinder blocks with a nice taupe vinyl siding to spruce things up even further.


What have you been fancify-ing recently?

Thursday, August 15, 2013

Finally Getting Some Shoe Organization.

Earlier this year, David and I got inspired to make our small closet a little more efficient. We replaced the single rod and shelf above it with a narrow bookshelf in the center, with double rods on each side and one long shelf over the top. We also installed lights on a dimmer so when one of us is getting dressed in the morning, we can see our clothes without blinding the other person.


It's worked wonderfully and we still love it, however, something was missing.


And that something was shoe organization. I had been on the lookout for one that would fit the space between the center shelf and wall, but at only 22" wide, it was more narrow than any I had found. Then, it occurred to me, why don't I just make my own? It's an incredibly simple design that even the most novice woodworker can tackle.

With the wood pile in the garage being organized, I knew I had the materials to build one. In fact, I planned to use the old wood shelves that came out of the bathroom closet when I updated it.

I started by measuring the space to see what the dimensions of the shelf needed to be, then I made a simple sketch of what I wanted it to look like.


Then, it was just a matter of measuring and cutting my wood. I needed two side pieces that were 12" tall, and 2 shelf pieces that were 21" wide. Each side piece was 3/4" thick, so I made sure to subtract that number from the width of the shelf pieces, otherwise the entire thing would be too wide to fit.

Once I got everything cut, I used a finish nailer to attach all the pieces, then took it upstairs to test it out. Unfortunately, it didn't fit. The wood I was using was quite warped, and so it ended up being about 1/2" too wide at the bottom, but fit perfectly on top. Instead of taking the whole thing apart and re-cutting my wood, I decided to shorten the side piece that was against to the wall so that it rested on top of the baseboard, instead of on the floor. I measured the height of the baseboard, then cut that amount off the side piece with the table saw.


I tested the fit again, with much success this time around. Then, it was painting time. I used a sample pot that I already had. It is Hacienda Tile by Valspar.


Once everything was dry, I set it in place.


You can see here how it sits on top the baseboard on the shorter side.


Much improved!


The entire project took about 1 1/2 hours, from measuring to putting the shoes on it, and was super easy! And the best part: since I used all materials I already had, it cost me nothing!

Sunday, August 11, 2013

Freakin' Bunnies, Part 2: Freakin' Squirrels


When I wrote about the garden before, I mentioned that we had some issues with rabbits eating our fledgling plants. Well, once our tomatoes plants began to bear ripening fruit, they came back with a vengeance. After going out to the garden for the second time only to find a beautifully red tomato with a huge bite out of it hanging on the vine, we could stand no more. So off to Lowe's we went to purchase a rabbit fence.


It was very easy to install, just driving the posts into the ground and then hanging the wire on the little clips on the post, making sure to get it super close to the ground. You don't want any sneaky rabbit getting underneath.

We were very pleased with out efforts, until  a few days later, when I found this.


TWO chewed upon tomatoes! As days passed, we found more and more tomatoes strewn about the yard, until we had almost none left on the plants. It was at this point we realized that our problem was now squirrels. Squirrels who can easily climb over our 30" tall rabbit fence. David did some googling for suggestions on keeping them away. He learned that squirrels, in fact, don't even like tomatoes. Which is why we kept finding fruit discarded with only one bite taken out. It was suggested that if a tastier alternative is offered, the squirrels will leave your plants alone.


So we now have a squirrel/bird feeder. We went with a platform type because it seemed like it would be the easiest for the squirrels to get to.


We fill it with sunflower seeds, because apparently squirrels like them. In fact, as I type this, I can see one eating out of the feeder. Along with birds below, eating what he drops, and a rabbit munching on grass nearby. It's like a paradise for woodland creatures.

So far, our tomatoes have been left alone since we hung the feeder. They are still quite small at this point, so hopefully the seeds are enough to keep our squirrels happy even as the tomatoes ripen. If not, spraying cayenne on the plants will be our next tactic.


In other news, our garage has been looking like this. David and I vowed to tackle it this weekend, and we so got on that.


It's so wonderful to be able to walk directly to the item you need without searching, or tripping over random stuff in the floor.


We finally got our bikes mounted on the wall.


And for the first time ever, the scrap wood pile got organized.

Does anyone have any additional tips on keeping unwanted animals out of your garden? What about keeping your garage tidy, because it seems like about every 6 months, it ends up looking like a disaster zone again.

Wednesday, August 7, 2013

The Crushing of My Dreams: Countertop Edition

In October of 2011, we upgraded our countertops from standard straight-off-the-shelf-at-Lowe's laminate to butcher block. We went with the Lagan series from Ikea, which, tragically, they don't carry anymore. We chose butcher block because it was very affordable (doing the entire kitchen was under $200), we liked the way it looked and felt it complemented our style well.


When we initially installed them, we experimented with a couple different products for sealing and protecting the wood. We first tried Ikea's Behandla polish. It wasn't really giving us the sheen that we wanted, so we next tried Tung Oil. It was a little better, but still not what we were looking for. After doing some research, we decided to try Waterlox. It seemed to get some great recommendations, and even though it was pricey ($26 for a quart) we decided it was worth it if it made our new counters last for the long haul.


Let me tell you, this stuff was amazing. We applied it with a brush and it went on super smooth and shiny. In all, we applied 7 coats. We applied it only to the tops and sides of the counters because the bottoms all had several coats of Behandla and Tung Oil and we figured that would be sufficient because they wouldn't be seeing any "action." 

Two years later and our counters were starting to look just a bit worn and had a few scratches in them. After seeing some beautiful inspiration on Pinterest like this and this, I decided I wanted to sand down the counters and stain them a beautiful dark brown.


I got all gung-ho (as I do) and went out to buy some stain, and came home and whipped out my sander to attack the counters immediately. Fortunately, someone was able to talk some sense into me, so I first got the piece that was cut out for the sink during installation. It had the exact amount of sealer on it as the rest of counter, so I would be able to judge exactly how the new stain would look, without doing any damage to the current counters.


I gave it a good through sanding with the orbital sander, then applied a coat of stain, let it soak in a few minutes, then wiped it off.


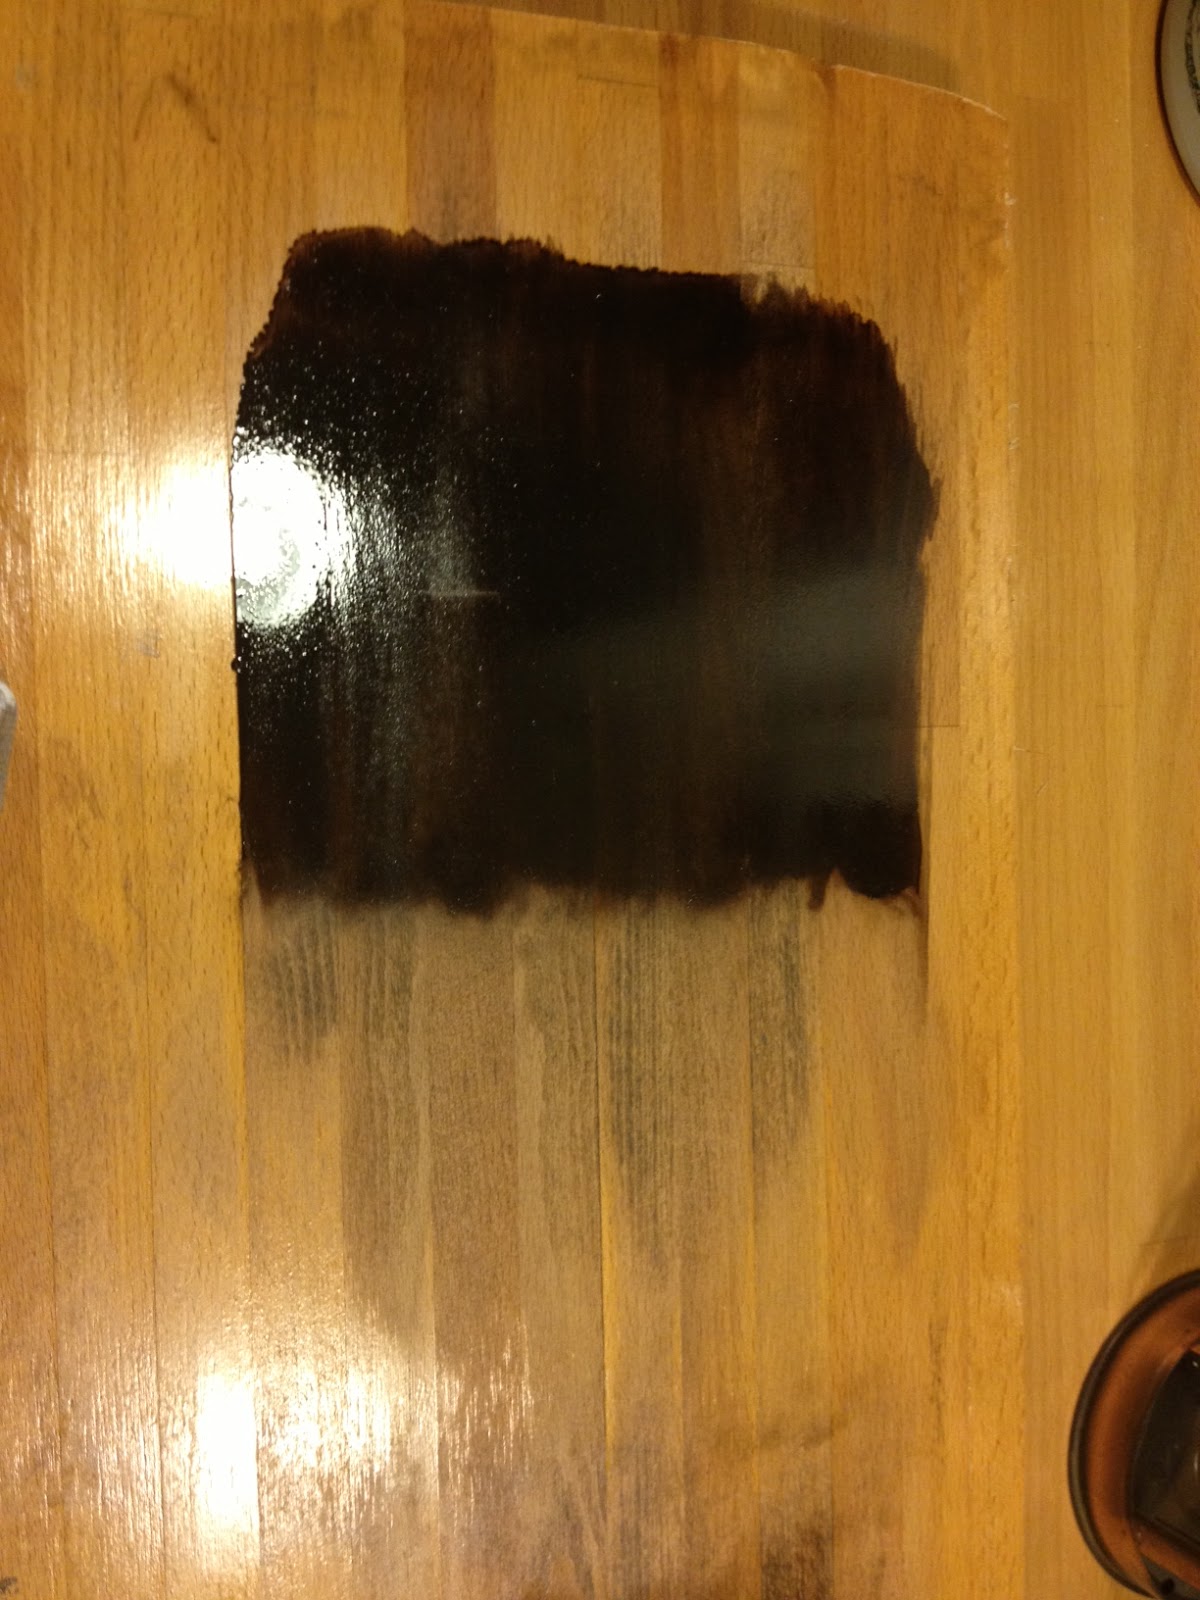
BIG FAIL. The wood barely soaked up the stain at all. After a period of great puzzlement (longer than I care to admit) David innocently asked, "You did stir the stain, didn't you?" Ummm, no. In my haste to get started, I had completely skipped this step.


What a difference that made going on! I got really excited... until I wiped off the excess (that's the bottom part of the picture). Back to no difference at all and another crushing blow to my excitement. We got pretty dejected at this point, and, despite trying a few different things, nothing seemed to make the stain soak in any better.


A few days passed, and David decided he was going to show that wood who's boss. He sanded the crap out of it. He literally sanded the 2 square foot area for about 10 minutes.


And I about cried because it was so beautiful and exactly what I wanted. However, I knew that spending 3 solid days sanding the countertops was not something I was willing to do. And so, I sadly said goodbye to my dreams of having dark wood counters.


After a period of grieving, I revisited the project, simply to refinish them the way they were. I started by clearing everything off the counters.


Then, I went over the whole thing with the orbital sander and a medium grit sandpaper. Then went over them again with a fine grit sanding sponge, making sure to get the edges and corners that the power sander couldn't reach.


I wasn't aiming to remove all the layers of finish as I was when trying to stain the wood, I just wanted to smooth everything out and remove any scratches or stains.


After that, wipe everything down REALLY WELL. I used a damp paper towel, followed by a dry paper towel, followed by my bare hand. If any dust is left behind, it will get in the finish and pretty much ruin your life.


Then I busted out my Waterlox and brush. I used the same medium sheen as before. This is actually the same bottle, it lasts forever.


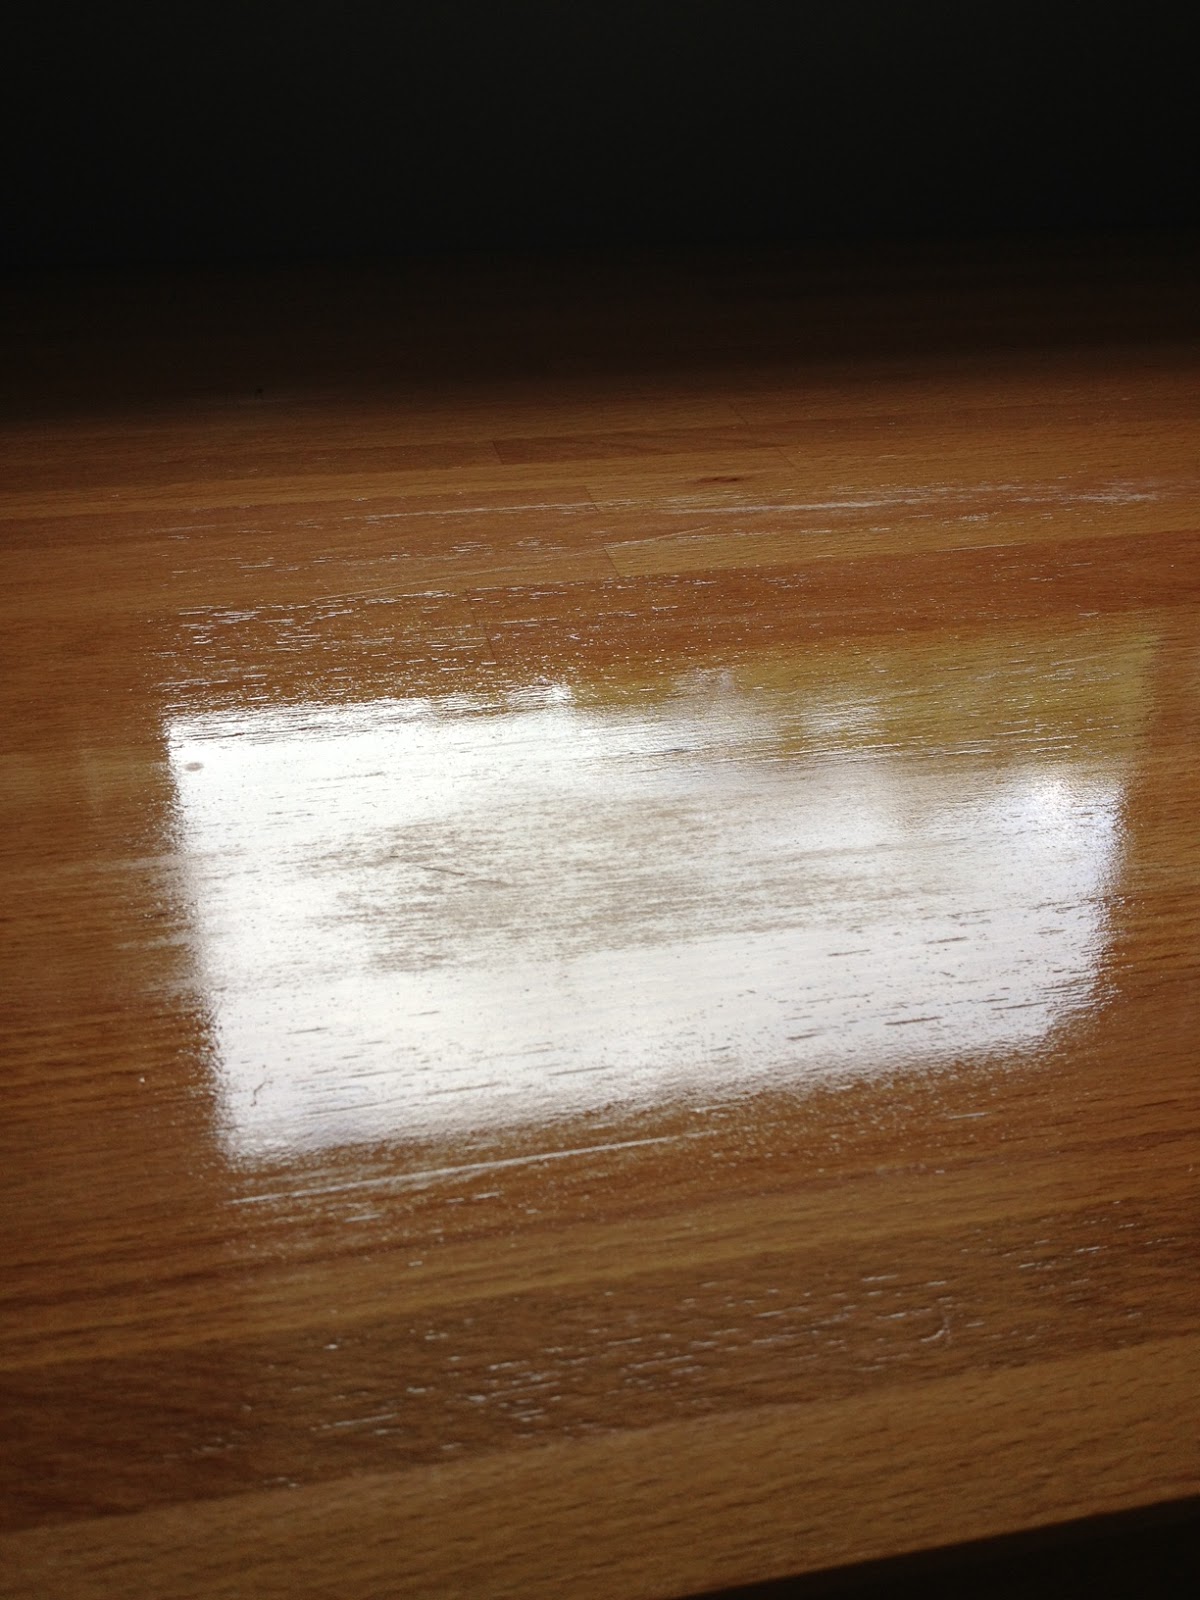
I poured a little directly on the wood, then used the brush to spread it around. This is the same method I used when initially applying it. You can see in the top of the above picture where it's already nicely spread.


There were a few spots that got a heavier sanding (like where there was a scratch) that absorbed the Waterlox more, and thus, were not as shiny. You can see one right in the center of the above picture, where the light is reflecting from the window. When I saw these, I knew I would need to apply a second coat. I left them to dry for 6 hours (which I later learned was supposed to be 24, whoops) before applying a second coat. I had all the windows open to help everything dry and cut down on fumes.


After two coats, I gave it a light sanding with the fine grit sanding sponge, then wiped them down with a damp paper towel to remove the dust. Everything was looking shiny and new again. I reapplied some clear silicone to the joints where 2 pieces of wood meet, as well as around the sink.


I was comfortable setting things on the counter after 24 hours (like a plate while I made a sandwich) but I waited 48 hours before moving anything back onto the counters that would be sitting there long term (like the KitchenAid mixer).

Overall, this was a very quick project (once I realized staining was not happening). Not including drying time, it took about 2 hours of actual work, from clearing the counters to applying the silicone.

So there you have it, my heart wrenching tale of refinishing counters. We have big dreams of one day closing in the carport to make it a larger kitchen, so maybe one day my dreams of dark wood counters will be realized.